🎓 Classroom Control Tools
These tools help you maintain focus, manage classroom behavior, and create structured learning experiences.
Overview
Classroom Control Tools give you ways to get students' attention, manage movement, track time, handle assignments, and personalize the student experience. These are your digital classroom management assistants.
Note
All Classroom Control Tools are designed to work together seamlessly. You can use Focus Mode before explaining a Timer-based activity, or Lock Players to keep students in an area while working on an Assignment.
Quick Reference
| Tool | What It Does | When to Use It |
|---|---|---|
| 👁️ Focus Mode | Dim screens and show a message | 🎯 Need everyone's attention, giving instructions |
| 🔒 Lock Players | Limit where students can move | 📍 Keep students in activity area, guided tours |
| ⏰ Timer | Visual countdown for activities | ⏱️ Timed challenges, activity transitions, time management |
| 📋 Assignments | Create and collect student work | 📝 Projects, written reflections, building challenges |
| 🏷️ Custom Nicknames | Let students choose display names | 🎨 Personalization, classroom community, preferred names |
👁️ Focus Mode
What it does
Dims students' screens, shows them your message, and prevents them from moving or interacting with the world. Think of it as the "eyes on me" button.
Tip
Focus Mode is one of the most powerful classroom management tools. Use it liberally whenever you need instant attention from the entire class.
When to use it
Common Use Cases (click to expand)
- 🎯 Getting attention: Need everyone to stop and listen
- 📢 Giving instructions: Explain the next activity while everyone's focused
- 🔄 Transitions: Moving between activities and need everyone ready
- ❗ Important announcements: Critical information everyone needs to hear
- ☕ Screen breaks: Pause gameplay for a discussion or demonstration
How to use it
Turn On Focus Mode for Everyone
- Right-click the Educator Toolbox in your hotbar
- Click Focus Mode
- Type your message (example: "Please look at the board" or "Pause and listen")
- Click Disable Globally (despite the name, this button toggles between ON and OFF)
- Toggle to Enable
Note
The button label "Disable Globally" can be confusing. When Focus Mode is OFF, clicking this button will ENABLE it globally. When Focus Mode is ON, clicking it will DISABLE it. The button toggles the state.
What students see:
- 🌑 Screen dims/darkens completely
- 💬 Your message appears in the center
- 🚫 They can't move, build, or interact
- 💭 They can still see chat (Minecraft limitation)

Turn Off Focus Mode
- Right-click the Educator Toolbox in your hotbar
- Click Focus Mode
- Click Disable Globally
Warning
Remember to disable Focus Mode when you're done! Students remain frozen until you turn it off. There's no automatic timer.
✅ What happens: Students instantly return to exactly where they were before Focus Mode activated. Their gamemode, position, and state are restored.
Focus Mode for Specific Students or Teams
- Right-click the Educator Toolbox in your hotbar
- Click Focus Mode
- Click Select Team (or Select Player)
- Choose the team or individual student
- Configure the message
- Toggle Focus Mode ON/OFF for just that group
Tip
Use Focus Mode on specific students or teams to give targeted instructions without freezing the entire class.
Focus Mode Features
✅ Core Capabilities:
- Students become invulnerable - Can't take damage while focused
- Students can't move - Completely frozen in place
- Teachers are never affected - Focus Mode never activates on teachers
- Works on offline players - If you enable it for someone offline, they'll see it when they rejoin
- Restores previous state - When disabled, students return to their exact previous condition
Tip
Best Practices: - Keep messages short and clear (students can't take notes while frozen) - Use Focus Mode before explaining complex instructions - Great for stopping the class quickly in an emergency - Can be used as a "pause button" for the whole class - Students offline when you enable it will see Focus Mode when they rejoin
Danger
Chat cannot be disabled during Focus Mode (Minecraft limitation), so students can still send messages. Set clear expectations about chat usage during focus time.
🔒 Lock Players
What it does
Creates an invisible boundary that prevents students from moving beyond a certain area. Students stay within the zone you define.
Note
Lock Players creates a circular boundary with a configurable radius. Students can move freely within the circle but cannot leave it.
When to use it
Lock Players Use Cases (click to expand)
- 📍 Keep students in activity area: Prevent wandering during focused tasks
- 🗺️ Guided tours: Keep the class together as you move around
- 🔍 Restrict exploration: Confine students to a specific build site or lesson area
- ⚠️ Safety boundaries: Keep students away from dangerous or unfinished areas
- 👥 Follow the teacher: Students automatically stay near you as you move
Lock Modes
📍 Center Mode (Fixed Location)
Sets a specific spot as the center of a circle. Students can move freely within the radius but can't leave the area.
When to use it: Building projects, confined activities, keeping students in one location.
👤 Player Mode (Follow Mode)
The boundary follows a specific player (usually you, the teacher). Students must stay within radius of that player as they move.
When to use it: Guided tours, walking lessons, keeping the class together while moving.
Tip
Player Mode is perfect for "field trips" in Minecraft. Students automatically follow along as you walk, maintaining a safe following distance.
How to use it
Create a New Lock
- Right-click the Educator Toolbox in your hotbar
- Click Lock Players
- Click Add a New Lock
- Choose who to lock:
- Single student
- Team
- Multiple teams
- Set the radius (how far they can move from center):
- Example: 10 blocks, 20 blocks, 50 blocks
- Choose lock mode:
- 📍 Center Mode - Fixed location (students can't leave the area)
- 👤 Player Mode - Follows a player (students move with the player)
- Configure options:
- Teleport to Center - Send students back if they try to leave (recommended ON)
- Show Boundaries - Display the edge of the area when students get close (recommended ON)
- Show Lock Message - Display a warning when students try to leave (recommended ON)
- Confirm the lock
Info
After creating a lock, it immediately takes effect. Students are constrained to the defined area until you remove the lock.
View and Remove Locks
- Right-click the Educator Toolbox in your hotbar
- Click Lock Players
- Click View Blocked Teams
- Select the lock to view details or remove it
Lock Settings Explained
📏 Radius
- Distance in blocks students can move from the center
- Example: Radius of 20 = students can move 20 blocks in any direction
- Larger radius = more freedom to explore
🔁 Teleport to Center
- ON: Students are automatically sent back if they reach the boundary
- OFF: Students are stopped at the boundary but not teleported
- Recommended: ON (smoother experience)
Tip
Teleport to Center ON prevents students from getting stuck at the edge or finding ways to push through the boundary.
✨ Show Boundaries
- ON: Particles appear at the edge when students get close
- OFF: No visual indication of the boundary
- Recommended: ON (helps students know the limits)
💬 Show Lock Message
- ON: Chat message appears when students try to leave
- OFF: No message, students just can't leave
- Recommended: ON (explains why they can't move)
Note
Locks work on offline players. If someone logs in while locked, the lock applies to them immediately upon joining.
Example uses:
- 🏗️ Building competition: Lock all students to their own plots with Center Mode
- 🖼️ Museum tour: Lock students in Player Mode following you through the exhibit
- ⛏️ Resource gathering: Lock students to a specific forest or mining area

⏰ Timer
What it does
Creates a visible countdown timer that all students can see. Shows on their screens and (optionally) as a physical object in the world.
Note
The Timer appears as a Boss Bar at the top of every student's screen, making it impossible to miss. It's one of the most visible features in the toolbox.
When to use it
Timer Use Cases (click to expand)
- ⏱️ Timed activities: Give students a specific amount of time to complete tasks
- 🔄 Transition management: Count down to the end of an activity
- 🏗️ Building challenges: Time-limited building competitions
- 📝 Testing: Timed quizzes or assessments
- 🎯 Focus periods: Sustained work time with a visible endpoint
How to use it
Create a Timer
- Right-click the Educator Toolbox in your hotbar
- Click Timer
- Click Create
- Set the duration:
- Choose a preset time (5 min, 10 min, 15 min, etc.)
- Or set a custom time
- The timer is created but not started yet
Tip
The timer doesn't start automatically. This lets you create it, explain the activity, and then start it when everyone is ready.
Control the Timer
Once created, you have these controls:
- ▶️ Start - Begin the countdown
- ⏸️ Pause - Temporarily stop the timer (can resume with Start)
- ✏️ Edit - Change the time remaining
- 🔄 Reset - Return to the original starting time
- 🗑️ Delete - Remove the timer completely
- 👁️ Hide Timer Entity - Make the physical world object invisible (Boss Bar still shows)
Tip
Use Pause for unexpected interruptions (like answering a student's complex question), then resume with Start when you're ready to continue.
How Students See the Timer
📊 Boss Bar (Top of Screen):
- Appears at the very top of the screen
- Shows time remaining
- Visible to all students at all times
- Example: "⏰ Time Remaining: 04:32"
🎈 Timer Entity (In World):
- Physical floating timer object
- Can be placed anywhere in the world
- Shows the same countdown
- Can be hidden if you only want the Boss Bar
Info
Only one timer can be active at a time. Creating a new timer will replace any existing timer.
✅ Best Practices:
- The Boss Bar is always visible, so students can't miss it
- Use Hide Timer Entity if you don't want a physical object in the world
- Edit lets you add or remove time if you need to adjust mid-activity
- Pause is great for unexpected interruptions
- Students can't interact with or break the timer entity
Example Timer Uses (click to expand)
- "You have 10 minutes to build a house"
- "5 minutes until we gather back here"
- "30 seconds remaining in the challenge!"
- "15 minutes to complete the scavenger hunt"
- "20 minutes of focused building time"

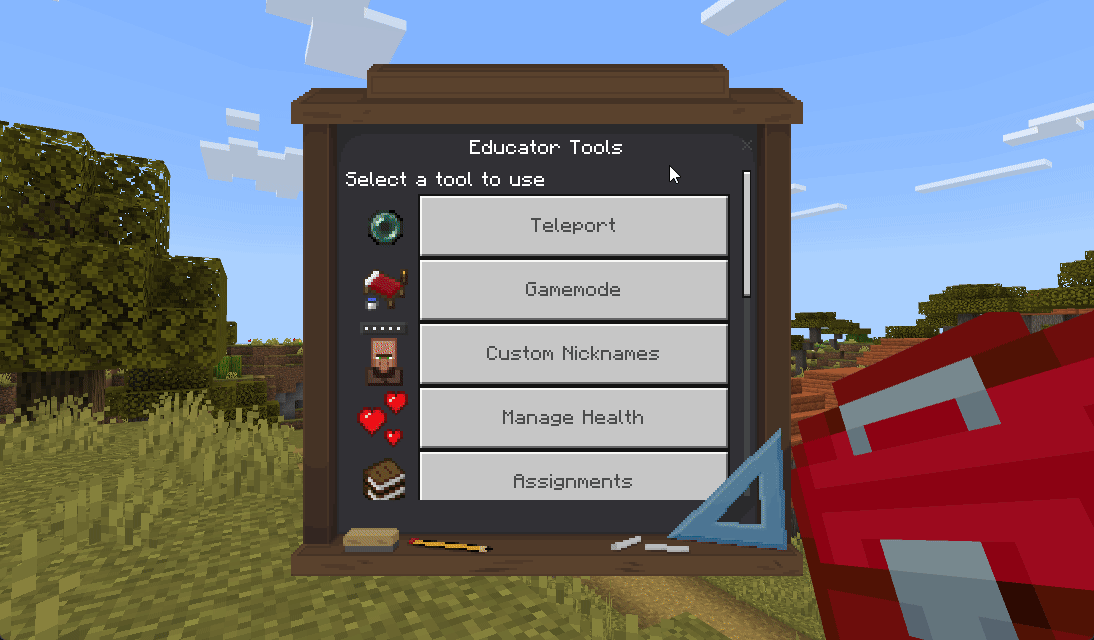
📋 Assignments
What it does
Creates structured assignments that students can submit with text responses and location markers. You can review submissions and track completion.
Note
Assignments combine text submissions with location data, making them perfect for building projects where you want to see both the student's reflection and their actual build location.
When to use it
Assignment Use Cases (click to expand)
- 🏗️ Building projects: Students submit their builds with descriptions
- 📝 Written reflections: Collect text responses to prompts or questions
- 🗺️ Scavenger hunts: Students find locations and submit them
- 📊 Progress check-ins: Quick status updates from students
- 🚪 Exit tickets: End-of-class reflections or summaries
Teacher Interface
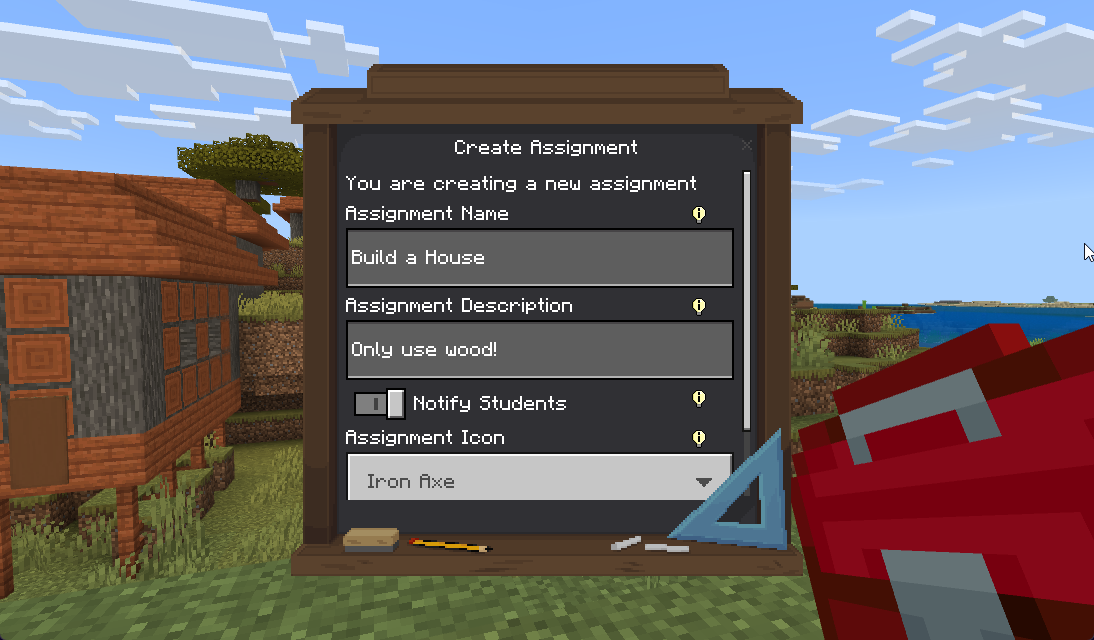
Create an Assignment
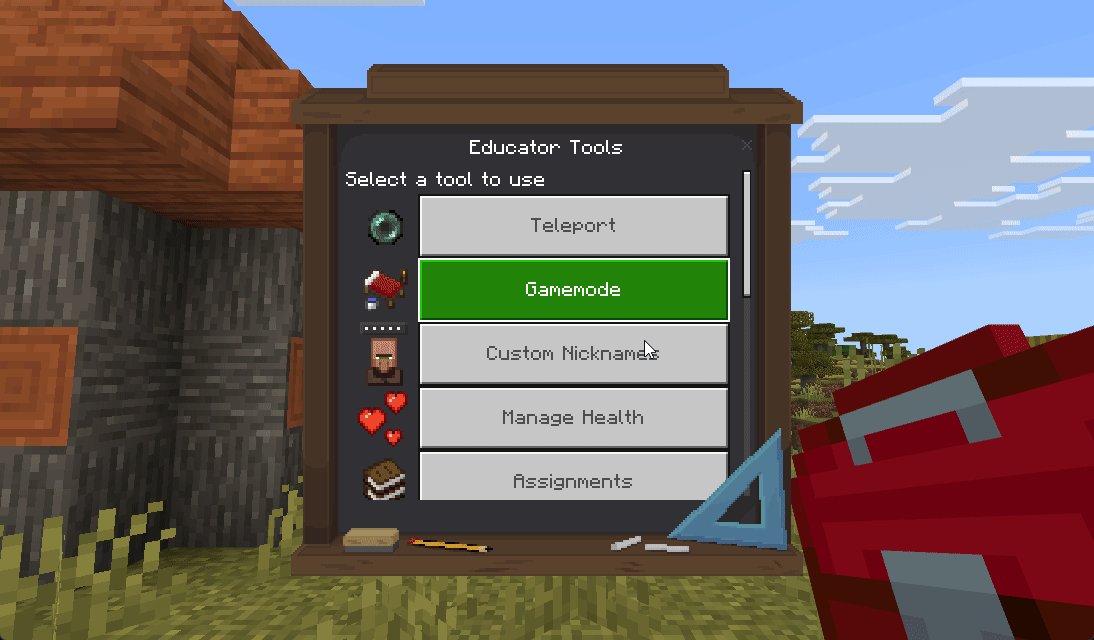
- Right-click the Educator Toolbox in your hotbar
- Click Assignments
- Click Create Assignment
- Fill in assignment details:
- 📌 Name - Assignment title (example: "Build a Medieval Castle")
- 📄 Description - Detailed instructions for students
- 🎨 Icon - Choose a visual symbol (🪓 Iron Axe, 🐟 Clownfish, 💎 Diamond, 🥚 Egg, or 🥔 Potato)
- 🔔 Notify Students - Toggle ON to send a chat notification when you create it
- Click Create
Tip
Always toggle Notify Students ON so everyone immediately knows there's a new assignment. Without notification, students must check the toolbox to discover new assignments.
View Active Assignments
- Right-click the Educator Toolbox in your hotbar
- Click Assignments
- Click Active Assignments
- Select an assignment to view submissions
What you see:
- ✅ List of all students who have submitted
- 💬 Each student's text response
- 📍 Location coordinates where they submitted (you can teleport there)
- ⏰ Timestamp of submission
Viewing a Submission
When viewing a specific assignment:
- Click on a student's name to see their submission
- Read their text response
- Click Teleport to Location to visit where they submitted from
- Review their work
Tip
The Teleport to Location feature is incredibly powerful for building projects. You can instantly visit each student's build site to review their work without manually searching for them.
Complete an Assignment
When the assignment deadline has passed or everyone has submitted:
- Open the assignment
- Click Complete Assignment
- Confirm
✅ What happens:
- Assignment moves to Completed Assignments
- Students can no longer submit or edit submissions
- You can still view all submissions
Info
Completing an assignment is permanent. Students cannot submit to completed assignments. Make sure all submissions are in before marking it complete.
View Completed Assignments
- Right-click the Educator Toolbox in your hotbar
- Click Assignments
- Click Completed Assignments
- Select an assignment to review past submissions
Student Interface
Students see a simplified view of assignments.
Note
Students can only see active assignments. They cannot access completed assignments after the teacher closes them.
View Assignments
- Open the Educator Toolbox (students have access to this in their inventory)
- Click Assignments
- See a list of all active assignments
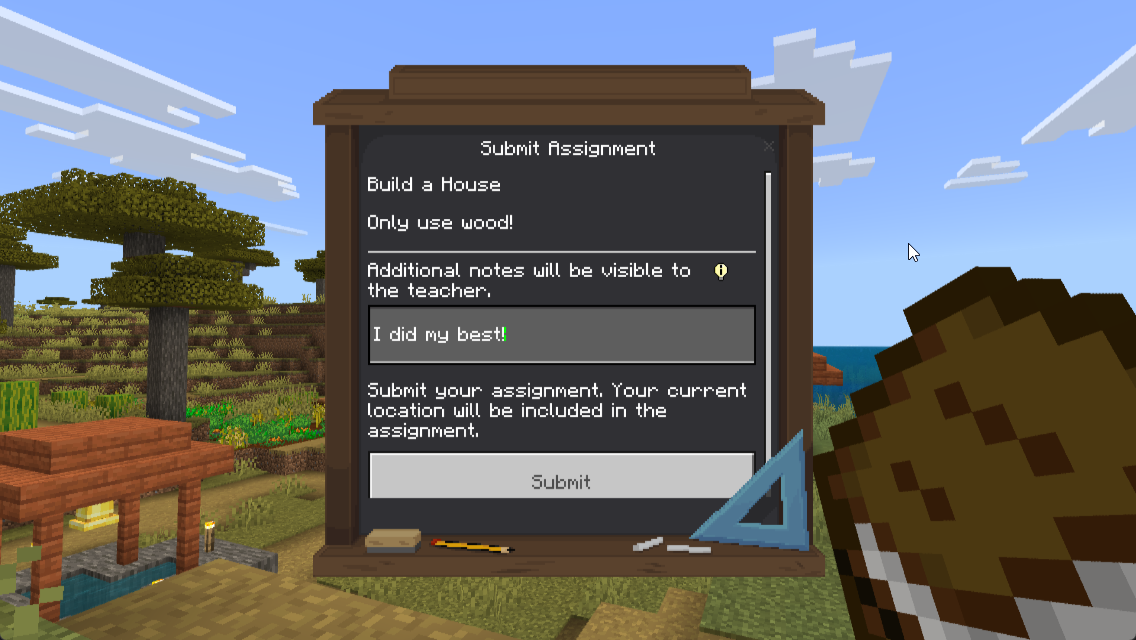
Submit an Assignment
- Open Assignments
- Select the assignment to submit
- Fill in the text field with their response
- Click Submit
What gets recorded:
- 📝 The student's text response
- 📍 Their current location (coordinates)
- ⏰ Timestamp of submission
Danger
Students cannot view their submission after submitting it. Once they click Submit, the text disappears. Encourage students to write their responses in an external document first if they want to keep a copy.
Check Submission Status
Students can see if they've submitted an assignment, but they cannot view their actual submission after submitting it.
✅ Best Practices:
- Use Notify Students when creating assignments so everyone knows immediately
- Teleport to Location is perfect for reviewing building projects
- Create a clear description so students know exactly what to submit
- Complete assignments to prevent late submissions
- Icons help students quickly identify assignments visually
Example Assignments (click to expand)
🏠 Building Project: - Name: "Build a Medieval Castle" - Description: "Create a castle with at least one tower, a wall, and a gate. Submit from inside your castle and describe your design choices."
🗺️ Scavenger Hunt: - Name: "Find a New Biome" - Description: "Explore and find a biome we haven't visited yet. Submit from that location and describe what you found."
💭 Reflection: - Name: "Today's Learning Reflection" - Description: "Write 3 sentences about what you learned in today's lesson."
📐 Math Structure: - Name: "Geometric Build Challenge" - Description: "Create a structure that demonstrates symmetry. Explain the mathematical principles you used."
🏷️ Custom Nicknames
What it does
Allows students to set personalized display names (nicknames) that appear instead of their Minecraft usernames. Teachers can approve, manage, and control the system.
Note
Custom Nicknames replace Minecraft usernames everywhere in the world - in chat, on nametags, in menus, and in join/leave messages. They're a powerful way to personalize the classroom experience.
When to use it
Nickname Use Cases (click to expand)
- 🎨 Personalization: Let students choose how they're addressed
- 🏳️🌈 Preferred names: Students can use their preferred names instead of usernames
- 🤝 Classroom community: Build identity and belonging
- ✨ Creative expression: Students can choose fun, appropriate nicknames
- 🎭 Role-play: Students can take on character names for educational scenarios
Teacher Settings
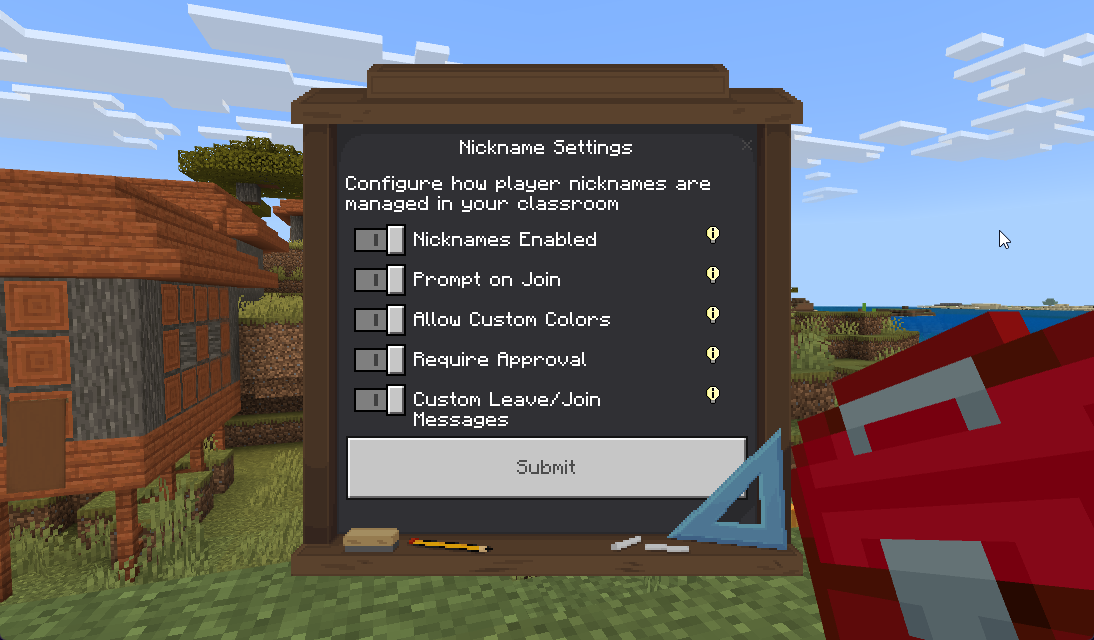
Configure Nickname System
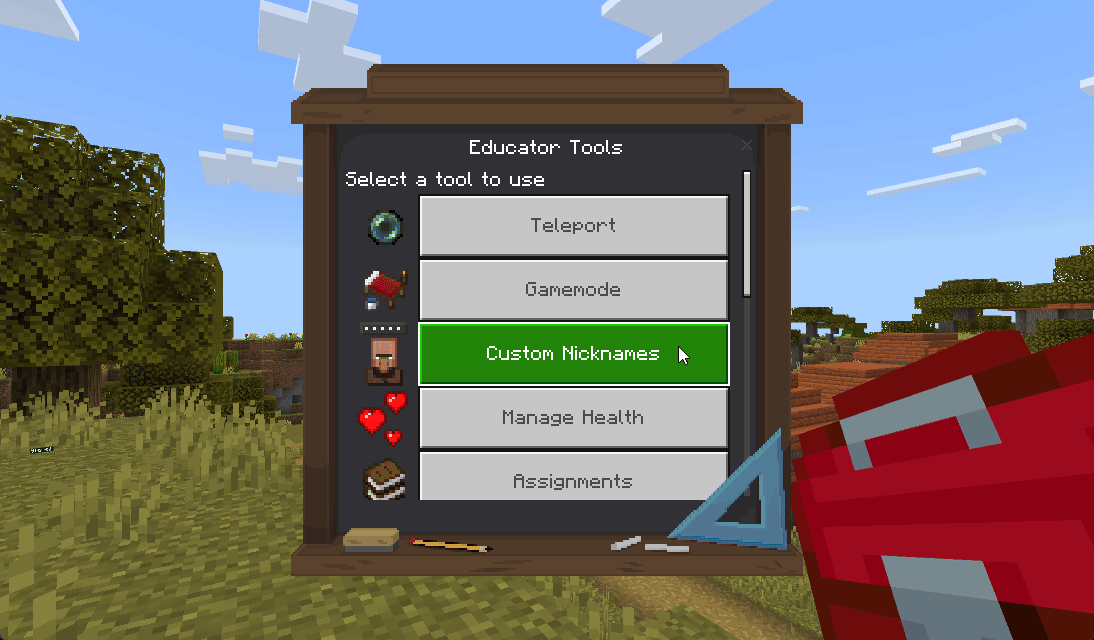
- Right-click the Educator Toolbox in your hotbar
- Click Custom Nicknames
- Click Nickname Settings
- Configure options:
⚙️ System Control:
- 🔘 Nicknames Enabled - Turn the entire system on or off
- 💬 Prompt on Join - Ask students to set a nickname when they join the world
- OFF - Only teachers can set nicknames
- ON - Students can set their own nicknames
- ✅ Require Approval - Teacher must approve all student nickname requests
- 🎨 Allow Custom Colors - Students can choose colors for their nicknames
- 📢 Custom Leave/Join Messages - Show personalized messages when students join/leave
Info
Prompt on Join determines who controls nicknames. When OFF, only teachers can assign nicknames. When ON, students can request their own nicknames (subject to approval if enabled).
Managing Student Nicknames
Set Nicknames for Students (Teacher Control)
- Right-click the Educator Toolbox in your hotbar
- Click Custom Nicknames
- Click Edit Player Nicknames
- Select the student
- Enter the desired nickname (leave empty to remove nickname)
- Choose a color
- Confirm
Note
Teacher-assigned nicknames take effect immediately with no approval needed. This bypasses the approval queue entirely.
Approve Nickname Requests
When Require Approval is enabled, student nickname changes must be approved:
- Right-click the Educator Toolbox in your hotbar
- Click Custom Nicknames
- Click Approval Queue
- Review pending requests
- ✅ Check the box next to requests you approve
- ❌ Uncheck the box next to requests you deny
- Click Submit
Students receive notifications when their nicknames are approved or denied.
Tip
The approval queue lets you maintain control over appropriate names while still giving students autonomy. Review requests promptly so students don't have to wait long.
Student Experience
Setting a Nickname (Student)
If "Prompt on Join" is ON:
- Join the world
- Nickname prompt appears automatically
- Enter desired nickname
- Choose color (if allowed)
- Submit
If nickname is pending approval:
- Student sees "Waiting for approval" message
- Receives notification when approved or denied
If "Prompt on Join" is OFF:
- Students cannot set their own nicknames
- Only teachers can assign nicknames
Danger
Students cannot change their nicknames once set without teacher approval (if approval is required). Make sure students understand they should choose carefully.
Nickname Display
Once approved/set, nicknames:
- Replace the default Minecraft username everywhere
- Appear in chat, on player nametags, in menus
- Show in custom colors (if enabled)
📢 Join/Leave Messages: When custom messages are enabled:
- Join:
[Nickname] joined the game (was [Original Name]) - Leave:
[Nickname] left the game (was [Original Name])
Configuration Examples
🔒 Strict Control (Teacher Only)
- Nicknames Enabled: ON
- Prompt on Join: OFF
- Require Approval: N/A (students can't request)
- Teachers assign all nicknames manually
Best for: Young students, situations requiring strict control
✅ Student Choice with Approval
- Nicknames Enabled: ON
- Prompt on Join: ON
- Require Approval: ON
- Allow Custom Colors: ON (optional)
- Students request, teachers approve
Best for: Most classroom situations, balanced control
🎨 Full Student Freedom
- Nicknames Enabled: ON
- Prompt on Join: ON
- Require Approval: OFF
- Allow Custom Colors: ON
- Students set nicknames instantly without approval
Best for: Mature students, low-risk environments
Warning
Full freedom mode allows students to set any nickname instantly. Only use this if you trust students to make appropriate choices.
✅ Best Practices:
- Start with Require Approval ON to maintain control over appropriate names
- Use nicknames to respect preferred names and pronouns
- Allow Custom Colors adds personalization but can be distracting (your choice)
- Nicknames persist across sessions - students don't need to re-enter them
- Teachers can change any student's nickname at any time
- To remove a nickname, just leave the field empty when editing
Example Nickname Uses (click to expand)
🏰 Historical Role-Play: - Let students choose fantasy character names for a medieval history lesson - Example: "Sir Galahad", "Queen Eleanor", "Blacksmith Thomas"
🎓 Preferred Names: - Use preferred names or shortened versions of long usernames - Respect student identity by using their chosen names
🎭 Creative Scenarios: - Create themed nicknames for role-playing scenarios - Example: "Dr. Science", "Captain Explorer", "Engineer Maya"
Related Tools
These classroom control tools work well together:
Tip
Combining tools creates powerful classroom management workflows. Here are effective combinations:
Tool Combination Examples (click to expand)
🎯 Starting a Timed Activity: 1. Use Focus Mode to get everyone's attention 2. Explain the activity while they're frozen 3. Create a Timer with the appropriate duration 4. Disable Focus Mode and start the Timer simultaneously
🗺️ Guided Tour with Boundaries: 1. Use Lock Players in Player Mode to keep students near you 2. Set a reasonable radius (like 20 blocks) 3. Walk through the area while students follow automatically 4. They can explore nearby but won't get left behind
📝 Building Assignment with Constraints: 1. Use Lock Players in Center Mode to confine students to their build plots 2. Create an Assignment for them to describe their builds 3. Set a Timer for the activity duration 4. Students build, submit, and stay in bounds
🎨 Personalized Classroom: 1. Use Custom Nicknames to let students personalize their identity 2. Use nicknames in Assignments for a more personal touch 3. Reference students by their chosen names when using Focus Mode messages
Next Steps
- Student Management Tools - Teleport, Teams, Inventory
- World Management Tools - Time, Weather, Settings
- All Features Guide - Complete tool reference
Need Help? Check the FAQ and Troubleshooting page.