🎯 Essential Tools
These are the 5 most important features of Educator Tools. These tools offer unique educational capabilities that don't exist in vanilla Minecraft. Master these first, then explore other features when you're ready.
Quick Reference
| Tool | What It Does | Why It's Essential |
|---|---|---|
| Custom Nicknames | Let students personalize their display names | Builds classroom community, actually know who is who |
| Assignments | Create and collect student work | Track progress, collect reflections, manage projects |
| Focus Mode | Get students' attention instantly | Essential classroom management, gives clear instructions |
| Lock Players | Keep students in specific areas | Maintains focus, prevents wandering, enables guided activities |
| Letter Blocks | Build words and math problems in 3D | Unique educational tool for literacy and numeracy |
🏷️ Custom Nicknames
What it does
Allows students to choose personalized display names that appear instead of their Minecraft usernames. You can configure whether students set their own names or if you assign them, and whether approval is required.
Why it's essential
Note
Custom Nicknames helps you build a professional, inclusive classroom environment where every student feels seen and respected.
- ✅ Builds classroom community - Students feel more connected with personalized names
- ✅ Respects identity - Honor preferred names and pronouns
- ✅ Professionalism - Use real names instead of gaming handles like "xXDragonSlayer99Xx"
- ✅ Engagement - Students are more invested when they can personalize their experience
How to use it
Enable Nicknames
Note
Custom Nicknames is enabled by default. These steps show how to customize the settings. No activation required unless previously disabled.
- Right-click the Educator Toolbox in your hotbar
- Click Custom Nicknames
- Click Settings
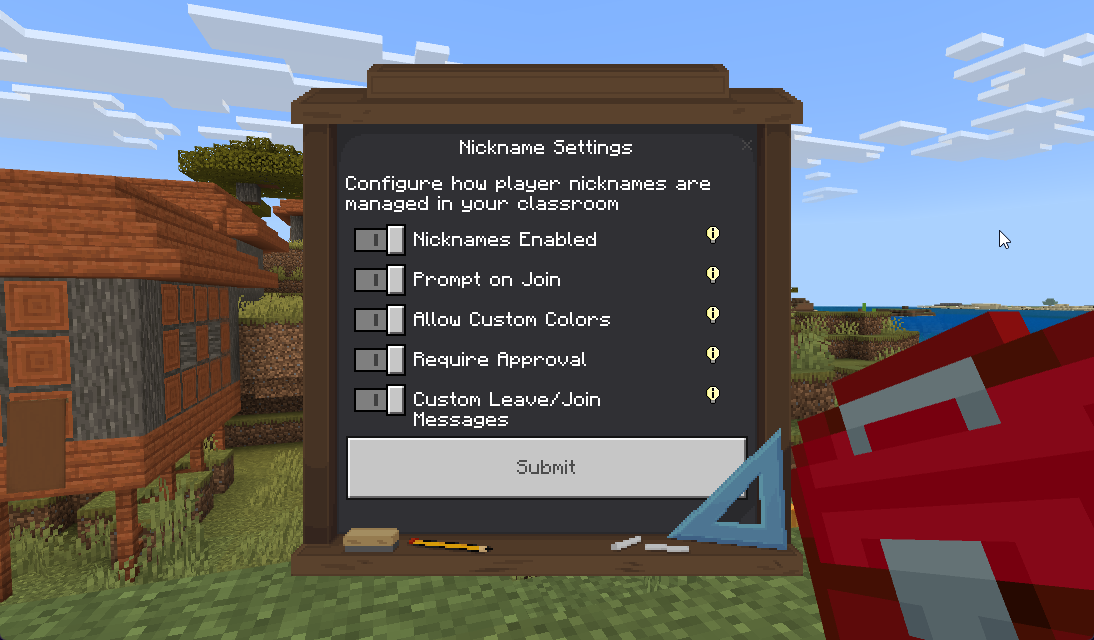
- Configure your preferences:
- Nicknames Enabled - Turn ON to activate the feature
- Prompt on Join - Turn ON to let students set their own names when they join
- Require Approval - Turn ON to review student requests before accepting
- Allow Custom Colors - Let students choose nickname colors (optional)
Approve Student Requests (if Require Approval is ON)
- Right-click the Educator Toolbox in your hotbar
- Click Custom Nicknames
- Click Approval Queue
- Review pending requests
- Check boxes next to approved names, uncheck rejected names
- Click Submit
Students receive notifications when approved or denied.
Tip
Batch approval: You can approve or deny multiple nickname requests at once by checking/unchecking multiple boxes before clicking Submit.
Manually Set Nicknames (Teacher Control)
- Right-click the Educator Toolbox in your hotbar
- Click Custom Nicknames
- Click Edit Player Nicknames
- Select the student
- Enter the desired nickname
- Choose a color
- Confirm
💡 Recommended Settings:
- Nicknames Enabled: ON - Activate the feature for your class
- Prompt on Join: ON - Let students choose their own names
- Require Approval: ON - Maintain control over appropriate names
- Allow Custom Colors: ON - Let students personalize with colors
Info
Nicknames persist across sessions. Once approved, students don't need to re-enter them every time they join the world.
📋 Assignments
What it does
Creates structured assignments where students can submit text responses and location markers. You can review submissions, track completion, and collect student work directly in Minecraft.
Why it's essential
Note
Assignments transforms Minecraft from a building game into a complete learning management system where you can track, assess, and document student work.
- ✅ Track student progress - See who completed work and who needs support
- ✅ Collect reflections - Gather written responses to prompts and questions
- ✅ Manage projects - Students submit builds with descriptions and coordinates
- ✅ Formative assessment - Quick check-ins and exit tickets
- ✅ Documentation - Keep records of student learning
How to use it
Create an Assignment
- Right-click the Educator Toolbox in your hotbar
- Click Assignments
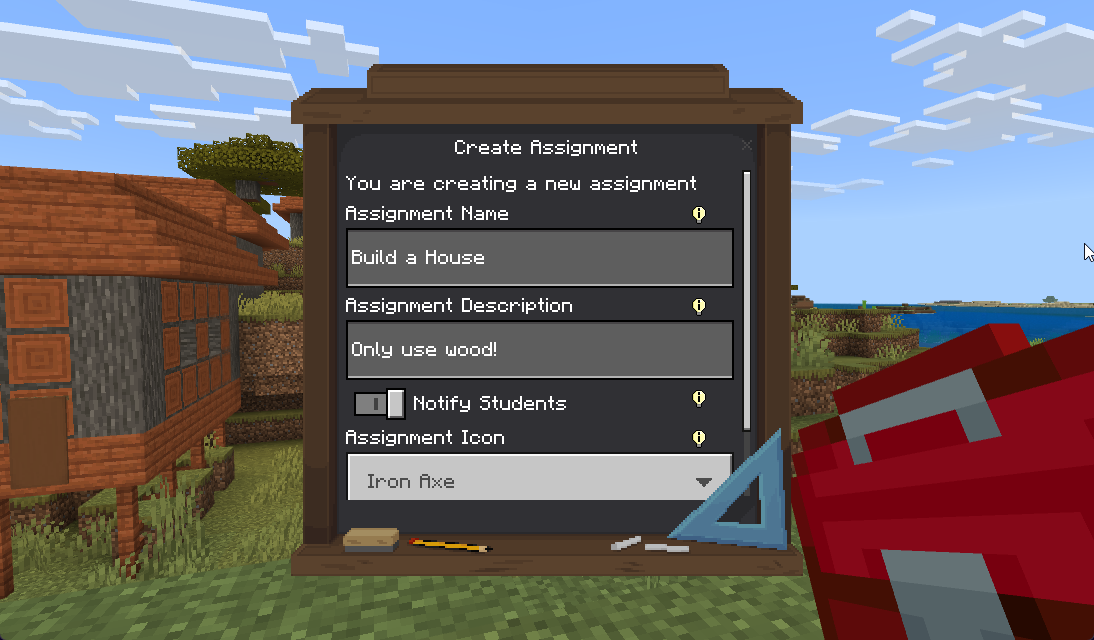
- Click Create Assignment
- Fill in assignment details:
- Name - Assignment title (example: "Build a Medieval Castle")
- Description - Detailed instructions for students
- Icon - Choose a visual symbol (Iron Axe, Clownfish, Diamond, Egg, or Potato)
- Notify Students - Toggle ON to send chat notification
- Click Create
What students see: An assignment appears in their Assignments menu with your instructions.
View Student Submissions
- Right-click the Educator Toolbox in your hotbar
- Click Assignments
- Click Active Assignments
- Select an assignment to view submissions
What you see:
- ✅ List of all students who submitted
- ✅ Each student's text response
- ✅ Location coordinates where they submitted
- ✅ Timestamp of submission
Tip
Quick Review: Use the teleport feature to visit each student's build location. This is much faster than walking around the world looking for projects!
Review a Submission
- Click on a student's name in the submissions list
- Read their text response
- Click Teleport to Location to visit their build
- Review their work in person
💡 Tip: Use the teleport feature to quickly tour all student projects!
Complete an Assignment
When the deadline has passed or everyone has submitted:
- Open the assignment
- Click Complete Assignment
- Confirm
What happens:
- ✅ Assignment moves to Completed Assignments
- ✅ Students can no longer submit or edit
- ✅ You can still view all submissions
Note
Completed assignments are archived, not deleted. You can always go back and review previous submissions for grading or documentation purposes.
Example uses:
- 📝 "Describe your building process in 2-3 sentences"
- 🌱 "What did you learn about ecosystems today?"
- 🏛️ "Submit your pyramid build with coordinates"
- ⭐ "Rate the activity 1-5 and explain why"
👁️ Focus Mode
What it does
Dims students' screens, shows them a message, and prevents them from moving or interacting. Think of it as the "eyes on me" button for your digital classroom.
Why it's essential
Note
Focus Mode is the digital equivalent of saying "Hands up, eyes on me!" - it instantly gets every student's attention without raising your voice.
- ✅ Instant attention - Stop everyone immediately when you need to speak
- ✅ Clear communication - Display important messages on every screen
- ✅ Classroom management - Digital equivalent of "hands up, eyes forward"
- ✅ Transitions - Pause between activities to give new instructions
- ✅ Emergency tool - Quickly stop all activity if needed
How to use it
Turn On Focus Mode for Everyone
- Right-click the Educator Toolbox in your hotbar
- Click Focus Mode
- Type your message (example: "Please look at the board" or "Listen for instructions")
- Click Disable Globally to toggle it to Enable
What students see:
- 🌑 Screen dims/darkens completely
- 💬 Your message appears in the center
- 🚫 They can't move, build, or interact
- 🛡️ They become invulnerable (can't take damage)

Warning
Don't forget to disable it! Students remain frozen until you manually turn Focus Mode off. Always check that you've disabled it before moving on.
Turn Off Focus Mode
- Right-click the Educator Toolbox in your hotbar
- Click Focus Mode
- Click Disable Globally
What happens: Students instantly return to exactly where they were before Focus Mode activated.
Focus Mode for Specific Students or Teams
- Right-click the Educator Toolbox in your hotbar
- Click Focus Mode
- Click Select Team (or Select Player)
- Choose the team or student
- Configure the message
- Toggle Focus Mode ON/OFF for just that group
Tip
Keep messages short and clear - Students can't take notes while frozen. Use Focus Mode to get attention, then disable it so they can write down instructions.
Tip
Works on offline players - If you enable Focus Mode while a student is offline, they'll see it immediately when they rejoin the world.
Info
Teachers are never affected - Focus Mode will never freeze you, even if you enable it globally. You can always move and work while students are paused.
Danger
Chat limitation: Chat cannot be disabled during Focus Mode (Minecraft limitation). Students can still send messages while frozen.
🔒 Lock Players
What it does
Creates invisible boundaries that prevent students from moving beyond a defined area. Students stay within the zone you set, either at a fixed location or following a player.
Why it's essential
Note
Lock Players creates invisible boundaries that keep students focused on the learning area without constant verbal reminders or supervision.
- ✅ Maintain focus - Keep students in activity areas without constant reminders
- ✅ Guided learning - Lead the class on tours while keeping everyone together
- ✅ Safety boundaries - Prevent access to dangerous or unfinished areas
- ✅ Structured activities - Confine students to specific build sites
- ✅ Classroom control - Students can't wander off during lessons
How to use it
Create a New Lock
- Right-click the Educator Toolbox in your hotbar
- Click Lock Players
- Click Add a New Lock
- Choose who to lock:
- Single student
- Team
- Multiple teams
- Set the radius (how far they can move):
- Example: 10 blocks, 20 blocks, 50 blocks
- Choose lock mode:
- Center Mode - Fixed location (students can't leave the area)
- Player Mode - Follows a player (students move with that player)
- Configure options:
- Teleport to Center - Send students back if they try to leave (recommended ON)
- Show Boundaries - Display the edge when students get close (recommended ON)
- Show Lock Message - Display warning when students try to leave (recommended ON)
- Confirm the lock
Lock Modes Explained
Note
Center Mode (Fixed Location):
- 📍 Sets a specific spot as the center of a boundary circle
- ✅ Students can move freely within the radius
- 🚫 They can't leave the area
- When to use: Building projects, confined activities, keeping students in one spot
Note
Player Mode (Follow Mode):
- 👥 The boundary follows a specific player (usually you, the teacher)
- 🚶 Students must stay within radius as that player moves
- When to use: Guided tours, walking lessons, keeping the class together while moving
Remove a Lock
- Right-click the Educator Toolbox in your hotbar
- Click Lock Players
- Click View Blocked Teams
- Select the lock to remove
- Confirm removal
Tip
Player Mode for tours: Use Player Mode to lead guided tours. Students will automatically follow you as you move, staying within the radius you set.
Tip
Center Mode for building: Use Center Mode for independent work. Students can work freely within their zone without wandering off.
Tip
Enable auto-return: Set Teleport to Center: ON so students automatically teleport back if they reach the boundary edge.
Warning
Don't forget to unlock! Always remove locks when activities are finished. Students won't be able to explore or move to new areas until you remove the lock.

🔤 Letter Blocks
What it does
Provides special building blocks that display letters, numbers, and symbols. Students can place them like regular blocks to spell words, create math problems, or make educational displays in 3D space.
Why it's essential
Note
Letter Blocks is a unique feature that doesn't exist in vanilla Minecraft. It transforms Minecraft into a 3D literacy and numeracy learning environment.
- ✅ Unique to Educator Tools - This feature doesn't exist in vanilla Minecraft
- ✅ Visual literacy - Students build words and see them in 3D
- ✅ Hands-on math - Create equations and number lines students can walk through
- ✅ Engagement - Kinesthetic learning through building
- ✅ Cross-curricular - Works for language arts, math, signs, labels, and more
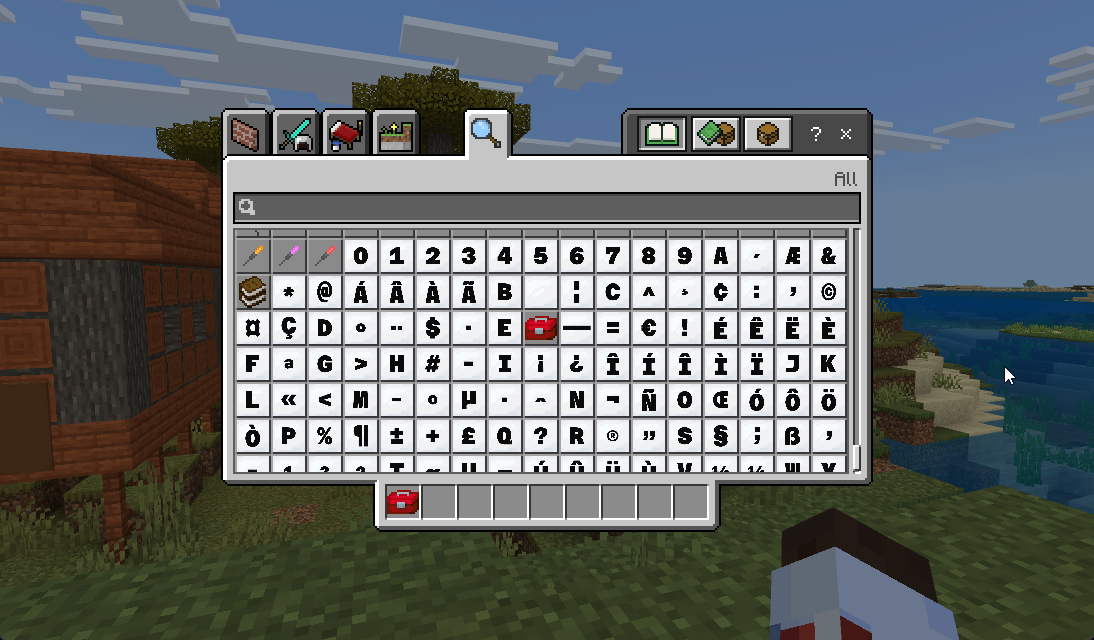
What's included
📦 Click to see all available characters
- Letters: Uppercase (A-Z) and lowercase (a-z)
- Numbers: 0, 1, 2, 3, 4, 5, 6, 7, 8, 9
- Math symbols: + (plus), - (minus), × (multiply), ÷ (divide), = (equals), ( (open parenthesis), ) (close parenthesis), [ (open bracket), ] (close bracket), { (open brace), } (close brace)
- Punctuation: . (period), , (comma), ? (question mark), ! (exclamation point)
- Special characters: ✓ (checkmark), ✗ (cross), → ↑ ↓ ← (arrows), $ € (currency)
Total: Hundreds of blocks covering almost any character you might need!
How to use it
Get Letter Blocks (Creative Mode)
- Make sure you're in Creative Mode
- Open your inventory (press E key)
- Click the Search tab (magnifying glass icon)
- Type "letter" in the search box
- Scroll through results - all letter blocks will appear
- Click any block to add it to your inventory
- Drag blocks to your hotbar for easy access
Give Letter Blocks to Students
Option 1: Students Get Their Own (Creative Mode)
- Put students in Creative Mode
- They can search for letter blocks in their inventory
Option 2: You Give Specific Blocks
- Use Inventory Management
- Give students the exact blocks they need for an activity
Build with Letter Blocks
To spell a word like "HELLO":
- Get the blocks: H, E, L, O from your inventory
- Place the H block
- Place the E block next to it
- Continue placing L, L, O in a row
- You now have "HELLO" spelled out in 3D!
Tip
Readability tips: - Place blocks at eye level or higher so they're easy to read - Leave empty spaces between words for readability - Stack blocks vertically for vertical text - Combine with regular blocks to create frames or backgrounds

Classroom Activity Ideas
📚 Language Arts Activities
- Spell vocabulary words
- Build sentences
- Create story titles
- Label parts of speech
- Build word walls
- Practice spelling with peer review
🔢 Math Activities
- Create number lines
- Build equations (2 + 3 = 5)
- Display multiplication tables
- Show fractions and decimals
- Label geometric shapes
- Build giant calculators
🎓 General Education
- Create signs and labels
- Build alphabets
- Make classroom rules
- Display learning objectives
- Create collaborative word art
- Design welcome messages
Tip
Want more characters? Check out More Letter Blocks Extension for hundreds of additional characters and 9 themed backgrounds!
Next Steps
Now that you know the 5 most important features, you can explore more tools:
- Student Management Tools - Teleport, Teams, Inventory, Gamemode
- Classroom Control Tools - Timer and more classroom management
- World Management Tools - Time, Weather, World Settings
- Letter Blocks Activities - Classroom activity ideas with Letter Blocks
Or jump to All Features Guide to see everything Educator Tools can do.
Need Help? Check the FAQ and Troubleshooting page or visit Getting Help.