👥 Student Management Tools
These tools help you organize and control your students in the Minecraft world.
Overview
Student Management Tools let you move students around, change their abilities, organize them into teams, and control what items they have. These are essential for keeping your classroom organized and running smoothly.
Quick Reference
| Tool | What It Does | When to Use It |
|---|---|---|
| 🚀 Teleport | Move students instantly | 📍 Gathering class, student lost, moving to activity area |
| 🎮 Gamemode | Change Creative/Survival mode | 🎯 Starting activities, giving/removing flying ability |
| 👥 Teams | Organize students into groups | 🤝 Group projects, color-coded teams, class organization |
| 🎒 Inventory Management | Control student items | 📦 Give materials, clear items, copy inventories |
| ❤️ Manage Health | Control health, hunger, and effects | 🏥 Healing students, clearing effects, toggling damage/hunger |
Note
All Student Management Tools work seamlessly together. For example, you can create teams and then teleport entire teams at once, or change the gamemode for a whole team with a single click.
🚀 Teleport
What it does
Instantly moves students to any location without them having to walk or fly there.
Tip
Teleporting is one of the most-used tools in classroom management. Use it liberally to save time and keep your class organized.
When to use it
Common Use Cases (click to expand)
- 📍 Gathering the class: Bring everyone together at the start of an activity
- 🔍 Student is lost: Teleport them back to the main area
- 🚶 Moving to new location: Transport the whole class to a new building site
- 🤝 Pairing students: Teleport one student to another for partner work
- 🆘 Rescuing students: Someone fell into a hole or got stuck somewhere
How to use it
- Right-click the Educator Toolbox in your hotbar
- Click Teleport
- Pick who to move:
- Single student (choose from list)
- Entire team (choose from your teams)
- All players at once
- Pick where to send them:
- To you ← Most common choice, gathers everyone to your location
- To another student ← Good for pairing or grouping
- The student(s) instantly appear at the chosen location
Tip
Quick Gather: To instantly bring everyone together, select "All Players" and teleport them to you. This is perfect for starting activities or getting everyone's attention.
✅ Benefits:
- Students keep their inventory and gamemode when teleported
- Teleporting doesn't interrupt what students are building
- You can teleport yourself using this tool too
- Works instantly across any distance
Info
At least 2 players must be online (you + one student) for the teleport tool to work.
🎮 Gamemode
What it does
Changes whether students are in Creative mode (unlimited resources, can fly) or Survival mode (limited resources, health matters).
Note
Gamemode determines what students can do in the world. Each mode has specific capabilities and restrictions designed for different types of activities.
When to use it
Gamemode Use Cases (click to expand)
- 🏗️ Creative mode: Building projects, creative activities, no resource limits needed
- ⚔️ Survival mode: Resource gathering challenges, adventure activities
- 🗺️ Adventure mode: Students can explore but can't break or place blocks (good for touring builds)
- 👁️ Spectator mode: Make students invisible observers who can fly through walls (good for assessment)
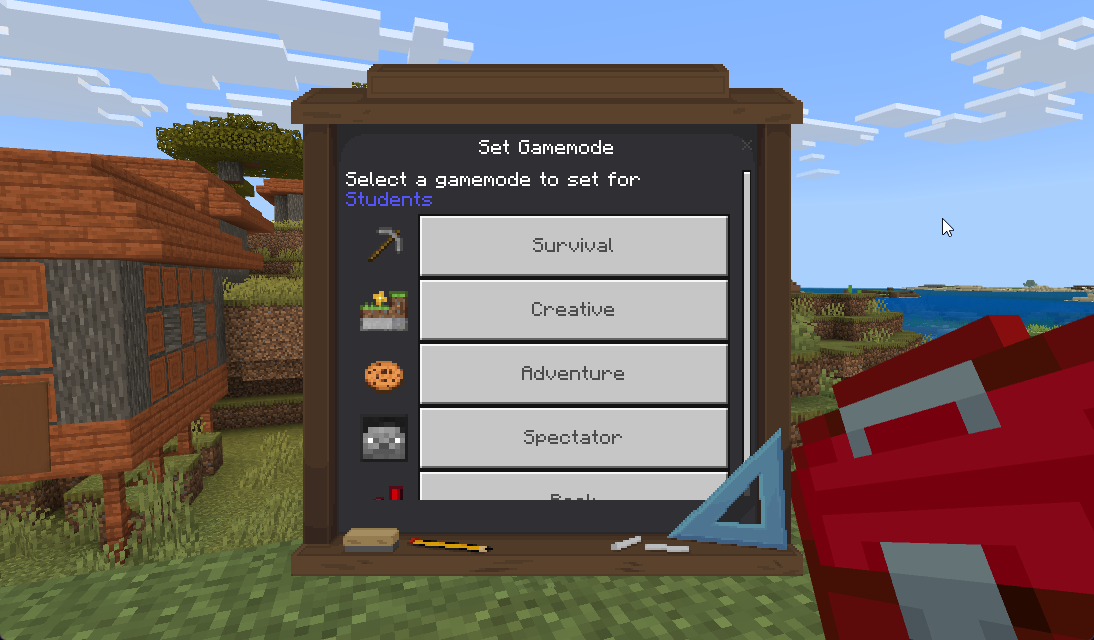
How to use it
- Right-click the Educator Toolbox in your hotbar
- Click Gamemode
- Choose who to change:
- Single student
- Team
- All players
- Yourself
- Pick the gamemode:
- 🏗️ Creative - Flying enabled, unlimited blocks, can't take damage
- ⚔️ Survival - Normal gameplay, health and hunger matter, must gather resources
- 🗺️ Adventure - Can interact and explore, but can't break or place blocks
- 👁️ Spectator - Invisible observer, can fly through blocks, can't interact
- Confirm the change
Tip
You can change your own gamemode too! Switch to Spectator mode to observe students without being seen, or match their gamemode to experience what they're experiencing.
Gamemode Explanations
🏗️ Creative Mode
Capabilities: - ✅ Can fly (double-tap jump to start flying) - ✅ Unlimited access to all blocks - ✅ Can't take damage or die - ✅ Can break blocks instantly
Best for: Building activities, creative projects
⚔️ Survival Mode
Capabilities: - 🚫 Can't fly (unless using Elytra) - 📦 Must find or craft items - ❤️ Health and hunger affect the player - ⏱️ Breaking blocks takes time
Best for: Resource gathering, survival challenges
🗺️ Adventure Mode
Capabilities: - 🚫 Can't break or place blocks - ✅ Can interact with objects (doors, buttons, chests) - ⚔️ Can fight mobs and take damage
Best for: Tours of builds, interactive stories, maps
Tip
Use Adventure mode when showing students a pre-built area you don't want modified. They can explore freely but can't accidentally break your builds.
👁️ Spectator Mode
Capabilities: - 👻 Invisible to other players - 🌫️ Can fly through solid blocks - 🚫 Can't interact with anything
Best for: Observing student work, assessment
Tip
Spectator mode is perfect for checking on student progress without being seen. You can fly through walls to see everyone's work without disrupting them.
Note
Most classroom building activities work best in Creative mode. Change to Survival for specific challenges or resource-gathering activities.
👥 Teams Management
What it does
Organizes students into groups (teams) that you can target with other tools. Makes it easy to manage multiple students at once.
Tip
Teams are a powerful organizational tool. Once you create teams, you can use them with almost every other tool in the Educator Toolbox (teleport entire teams, change gamemode for a whole team, etc.).
When to use it
Team Organization Strategies
- 🤝 Group projects: Create teams for collaborative building
- 🎨 Color-coded organization: Assign students to colored teams for easy identification
- 📚 Differentiated instruction: Create teams for different skill levels or activities
- 🪑 Class structure: Organize by table groups or learning pods
- 🏆 Games and competitions: Set up teams for Minecraft-based educational games
Default Teams
Three teams are always available:
- 👥 All Players - Every person in the world
- 👨🏫 Teachers - All designated teaching staff (you can add other teachers here)
- 🎓 Students - Everyone who isn't a teacher
Info
Default teams (All Players, Teachers, Students) cannot be deleted. They are permanent fixtures for easy classroom management.
How to use it
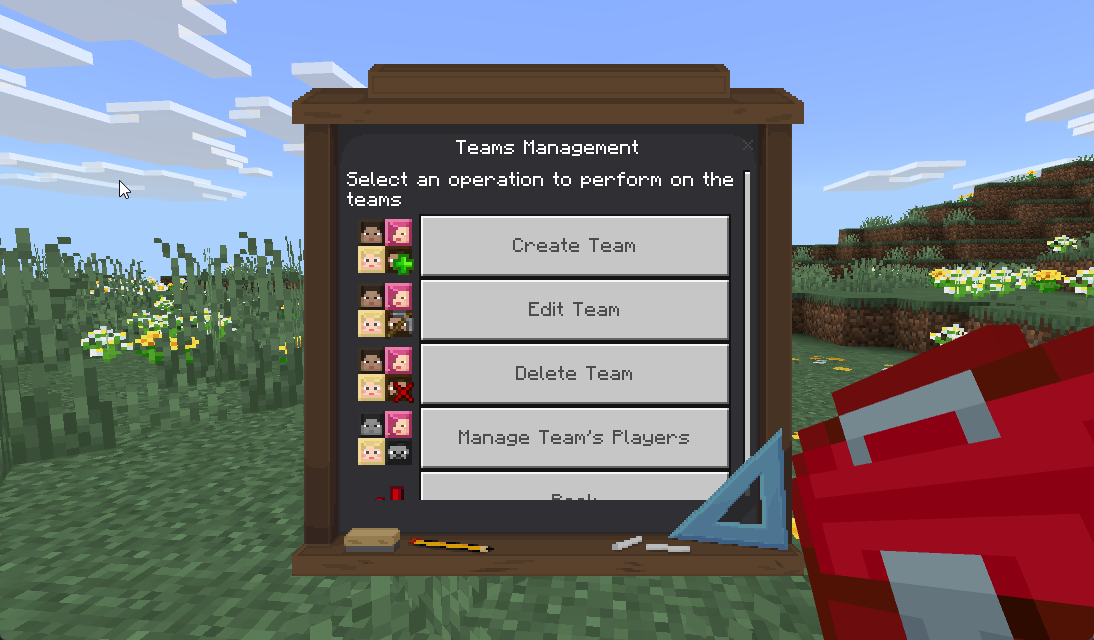
Creating a New Team
- Right-click the Educator Toolbox in your hotbar
- Click Teams Management
- Click Create New Team
- Fill in team information:
- Team Name - What the team is called (example: "Red Team", "Table 1", "Builders")
- Description - Optional details about the team's purpose
- Icon - Choose a visual symbol (🪓 Iron Axe, 🐟 Clownfish, 💎 Diamond, 🥚 Egg, or 🥔 Potato)
- Confirm creation
Tip
Use descriptive names like "Red Team" or "Table 3" so students immediately understand which team they're on.
Adding Students to a Team
- Right-click the Educator Toolbox in your hotbar
- Click Teams Management
- Select the team you want to edit
- Click Manage Members
- Click Add Player
- Select the student to add
- Repeat for additional students
Removing Students from a Team
- Right-click the Educator Toolbox in your hotbar
- Click Teams Management
- Select the team
- Click Manage Members
- Click on the student you want to remove
- Confirm removal
Deleting a Team
- Right-click the Educator Toolbox in your hotbar
- Click Teams Management
- Select the team to delete
- Click Delete Team
- Confirm deletion
Danger
You cannot delete the default teams (All Players, Teachers, Students). Only custom teams can be removed.
✅ Team Benefits:
- Create teams at the start of class for easy management throughout the session
- Teams work with almost all other tools (Teleport, Gamemode, Inventory Management, etc.)
- A student can be in multiple custom teams at once
- Teams persist between sessions - you don't have to recreate them each time
Example Team Structures
🎨 Color teams: - Red Team, Blue Team, Green Team, Yellow Team
🪑 Table groups: - Table 1, Table 2, Table 3
📊 Skill levels: - Beginners, Intermediate, Advanced
🏗️ Project groups: - Architects, Landscapers, Interior Designers
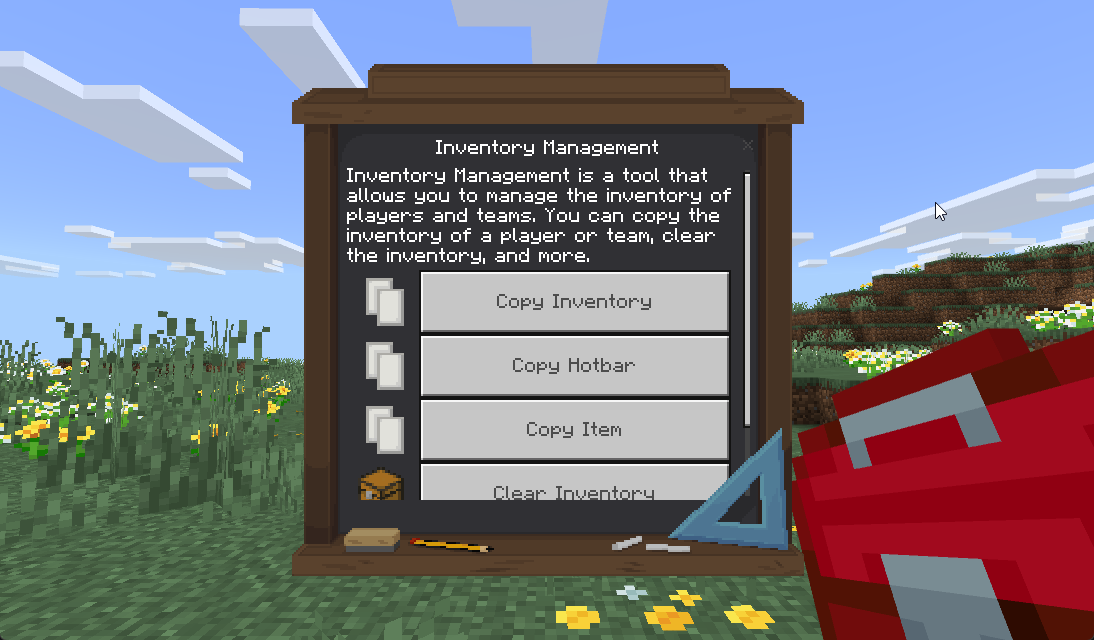
🎒 Inventory Management
What it does
Controls what items students have in their inventories. You can give everyone the same items, clear unwanted items, or copy one student's inventory to others.
Note
Inventory Management is perfect for ensuring everyone starts an activity with the exact same materials. It saves time and prevents students from being distracted by missing items.
When to use it
Inventory Management Use Cases
- 📦 Give materials: Ensure everyone has the same starting materials for an activity
- 🧹 Clear items: Remove all items to start fresh
- 📋 Copy inventory: Quickly give everyone the same items as one student
- 🚫 Remove specific items: Take away items that are causing problems
- ⚙️ Standardize hotbars: Make sure everyone has tools in the same slots
Available Operations
| Operation | What It Does | Icon |
|---|---|---|
| Copy Inventory | Copy all items from one student to another student or team | 📦 |
| Copy Hotbar | Copy only the bottom row of items (hotbar - first 9 slots) | 🎯 |
| Copy Item | Copy one specific item type from one student to others | 🧱 |
| Clear Inventory | Remove all items from selected students | 🗑️ |
How to use it
Copy Full Inventory
Perfect for giving everyone the same materials after one student has collected what's needed.
- Right-click the Educator Toolbox in your hotbar
- Click Inventory Management
- Click Copy Inventory
- Pick the source (who has the items you want to copy):
- A student
- A team
- Yourself
- Pick the target (who should receive the items):
- A student
- A team
- Everyone
- Confirm the copy
Note
Every item in the source inventory is duplicated to the target(s). Original items stay in the source inventory - nothing is moved or removed.
Copy Hotbar Only
Same as Copy Inventory, but only copies the bottom 9 slots (hotbar) instead of the full inventory.
- Right-click the Educator Toolbox in your hotbar
- Click Inventory Management
- Click Copy Hotbar
- Select source and target
- Confirm
Tip
Use Copy Hotbar to give everyone the same tools without affecting the materials they've already collected in their main inventory.
Copy Specific Item
Copy just one type of item (like 64 wooden planks) to multiple students.
- Right-click the Educator Toolbox in your hotbar
- Click Inventory Management
- Click Copy Item
- Select the source (who has the item)
- Specify the item (either by name or slot number)
- Select the target (who receives the item)
- Confirm
Clear Inventory
Removes all items from selected students. Useful for starting activities fresh.
- Right-click the Educator Toolbox in your hotbar
- Click Inventory Management
- Click Clear Inventory
- Select who to clear:
- Single student
- Team
- All players
- Confirm the clear
Warning
Clear Inventory permanently deletes items! Make sure students don't have important work in their inventory before clearing. This action cannot be undone.
✅ Best Practices:
- Create a "template student" with perfect starting items, then copy to everyone
- Use Copy Hotbar to give tools without affecting students' collected materials
- Clear Inventory at the start of new activities for a fresh start
- Copy Item is great for giving everyone the same amount of one resource
Example Workflow: Setting Up Starting Materials
- Set up your own inventory with the perfect starting materials
- Use Copy Inventory with yourself as source, All Players as target
- Everyone now has the exact same items as you!
This workflow ensures perfect consistency and saves time compared to manually distributing items.
Info
Requirements for Copy Operations: - At least 2 players must be online for copy operations - Both source and target players must be online for copy to work
❤️ Manage Health
What it does
Controls student health, hunger, and status effects. You can heal students, remove unwanted effects, reset health settings to defaults, or configure per-team health behavior.
Note
Manage Health is particularly useful in Survival mode activities where health and hunger matter. In Creative mode, students can't take damage, so this tool has limited use.
When to use it
Health Management Use Cases
- 🏥 Healing students: Restore health and hunger after combat or accidents
- 🧹 Clearing effects: Remove all active status effects (poison, slowness, etc.)
- 🔄 Resetting settings: Return health properties to defaults before a new activity
- ⚙️ Configuring behavior: Toggle damage, hunger, or effect immunity per team
How to use it
- Right-click the Educator Toolbox in your hotbar
- Click Manage Health
- Choose who to affect (select a team, the tool targets entire teams)
- Select the action:
- Heal - Clears all effects, briefly restores hunger, and resets health to full
- Clear Effects - Removes all active status effects from players
- Reset - Returns health settings to defaults (damage on, hunger on, effect immunity off) and heals
- Settings - Opens toggles to configure health behavior (see below)
Tip
Use Heal before starting Survival mode challenges to ensure everyone begins at full health and hunger.
Health Settings
The Settings button opens a panel with three toggles that control ongoing health behavior for the selected team:
| Toggle | What It Does |
|---|---|
| Enable Damage | Turn on/off the ability to take damage. When off, players receive permanent regeneration. |
| Enable Hunger | Turn on/off hunger. When off, players receive permanent saturation. |
| Enable Effect Immunity | When on, all effects are continuously removed from players (including positive ones). |
Warning
Enabling Effect Immunity removes all effects, including beneficial ones like speed boosts or night vision. Use with caution.
✅ Common Uses:
- Heal everyone to full health and hunger before a PvP challenge
- Clear unwanted effects (poison, slowness) after exploring dangerous areas
- Disable damage for a peaceful building session without switching to Creative mode
- Turn off hunger so students aren't distracted during a lesson
- Enable effect immunity to prevent potion-based disruptions
Related Tools
These tools work great in combination:
Tip
Combining tools creates powerful workflows. Here are some effective combinations:
Tool Combination Examples
🎯 Starting a Group Activity:
- Use Teams Management to organize students into groups
- Use Teleport to move entire teams to their work areas
- Use Inventory Management to give each team their starting materials
🏗️ Building Project Setup:
- Change students to Creative Mode for unlimited building
- Use Inventory Management to give everyone the same tools
- Use Teleport to move everyone to the build site
⚔️ Survival Challenge Preparation:
- Change students to Survival Mode
- Use Manage Health to ensure everyone starts at full health
- Use Teleport to position teams at their starting locations
🔍 Assessment and Observation:
- Change yourself to Spectator Mode to observe invisibly
- Use Teleport to move between student work areas
- Review each student's progress without disrupting their work
Next Steps
- Classroom Control Tools - Focus Mode, Timer, Freeze Students
- World Management Tools - Time, Weather, World Settings
- All Features Guide - Complete tool reference
Need Help? Check the FAQ and Troubleshooting page.